- Matplotlib Basics
- Matplotlib - Home
- Matplotlib - Introduction
- Matplotlib - Vs Seaborn
- Matplotlib - Environment Setup
- Matplotlib - Anaconda distribution
- Matplotlib - Jupyter Notebook
- Matplotlib - Pyplot API
- Matplotlib - Simple Plot
- Matplotlib - Saving Figures
- Matplotlib - Markers
- Matplotlib - Figures
- Matplotlib - Styles
- Matplotlib - Legends
- Matplotlib - Colors
- Matplotlib - Colormaps
- Matplotlib - Colormap Normalization
- Matplotlib - Choosing Colormaps
- Matplotlib - Colorbars
- Matplotlib - Text
- Matplotlib - Text properties
- Matplotlib - Subplot Titles
- Matplotlib - Images
- Matplotlib - Image Masking
- Matplotlib - Annotations
- Matplotlib - Arrows
- Matplotlib - Fonts
- Matplotlib - What are Fonts?
- Setting Font Properties Globally
- Matplotlib - Font Indexing
- Matplotlib - Font Properties
- Matplotlib - Scales
- Matplotlib - Linear and Logarthmic Scales
- Matplotlib - Symmetrical Logarithmic and Logit Scales
- Matplotlib - LaTeX
- Matplotlib - What is LaTeX?
- Matplotlib - LaTeX for Mathematical Expressions
- Matplotlib - LaTeX Text Formatting in Annotations
- Matplotlib - PostScript
- Enabling LaTex Rendering in Annotations
- Matplotlib - Mathematical Expressions
- Matplotlib - Animations
- Matplotlib - Artists
- Matplotlib - Styling with Cycler
- Matplotlib - Paths
- Matplotlib - Path Effects
- Matplotlib - Transforms
- Matplotlib - Ticks and Tick Labels
- Matplotlib - Radian Ticks
- Matplotlib - Dateticks
- Matplotlib - Tick Formatters
- Matplotlib - Tick Locators
- Matplotlib - Basic Units
- Matplotlib - Autoscaling
- Matplotlib - Reverse Axes
- Matplotlib - Logarithmic Axes
- Matplotlib - Symlog
- Matplotlib - Unit Handling
- Matplotlib - Ellipse with Units
- Matplotlib - Spines
- Matplotlib - Axis Ranges
- Matplotlib - Axis Scales
- Matplotlib - Axis Ticks
- Matplotlib - Formatting Axes
- Matplotlib - Axes Class
- Matplotlib - Twin Axes
- Matplotlib - Figure Class
- Matplotlib - Multiplots
- Matplotlib - Grids
- Matplotlib - Object-oriented Interface
- Matplotlib - PyLab module
- Matplotlib - Subplots() Function
- Matplotlib - Subplot2grid() Function
- Matplotlib - Anchored Artists
- Matplotlib - Manual Contour
- Matplotlib - Coords Report
- Matplotlib - AGG filter
- Matplotlib - Ribbon Box
- Matplotlib - Fill Spiral
- Matplotlib - Findobj Demo
- Matplotlib - Hyperlinks
- Matplotlib - Image Thumbnail
- Matplotlib - Plotting with Keywords
- Matplotlib - Create Logo
- Matplotlib - Multipage PDF
- Matplotlib - Multiprocessing
- Matplotlib - Print Stdout
- Matplotlib - Compound Path
- Matplotlib - Sankey Class
- Matplotlib - MRI with EEG
- Matplotlib - Stylesheets
- Matplotlib - Background Colors
- Matplotlib - Basemap
- Matplotlib Event Handling
- Matplotlib - Event Handling
- Matplotlib - Close Event
- Matplotlib - Mouse Move
- Matplotlib - Click Events
- Matplotlib - Scroll Event
- Matplotlib - Keypress Event
- Matplotlib - Pick Event
- Matplotlib - Looking Glass
- Matplotlib - Path Editor
- Matplotlib - Poly Editor
- Matplotlib - Timers
- Matplotlib - Viewlims
- Matplotlib - Zoom Window
- Matplotlib Plotting
- Matplotlib - Bar Graphs
- Matplotlib - Histogram
- Matplotlib - Pie Chart
- Matplotlib - Scatter Plot
- Matplotlib - Box Plot
- Matplotlib - Violin Plot
- Matplotlib - Contour Plot
- Matplotlib - 3D Plotting
- Matplotlib - 3D Contours
- Matplotlib - 3D Wireframe Plot
- Matplotlib - 3D Surface Plot
- Matplotlib - Quiver Plot
- Matplotlib Useful Resources
- Matplotlib - Quick Guide
- Matplotlib - Useful Resources
- Matplotlib - Discussion
Matplotlib - Mouse Move
In general computer programming and software design, the term mouse move refers to an action of moving a computer mouse device across a surface to create the corresponding cursor or pointer movement on-screen.
Mouse Move in Matplotlib
The mouse move event in Matplotlib allows users to capture the cursor's position over a plotted figure. This capability enables the creation of interactive features, such as displaying information at the cursor location or updating visualizations in real time based on the cursor's movements.
In this tutorial, we will explore how to use Mouse movement events in Matplotlib to enhance interactive plots. This is done by connecting to the motion_notify_event, you can capture the cursor's position and implement various actions, providing users with an intuitive way to explore and analyze plotted data.
Example
Let's start with a simple example that prints the data and pixel coordinates as the mouse moves over output figure.
import matplotlib.pyplot as plt
import numpy as np

# Input data for ploting a circle
angs = np.linspace(0, 2 * np.pi, 10**6)
rs = np.zeros_like(angs) + 1
xs = rs * np.cos(angs)
ys = rs * np.sin(angs)

# Create a figure
fig, ax = plt.subplots(figsize=(7, 4))

# Plot the data
plt.plot(xs, ys)

# Function to handle the event
def on_move(event):
   if event.inaxes:
      print(f'data coords {event.xdata}, {event.ydata},',
         f'pixel coords {event.x}, {event.y}')

# connect the event with the callable function
binding_id = plt.connect('motion_notify_event', on_move)

# Display the plot
plt.show()
Output
On executing the above program you will get the following output −
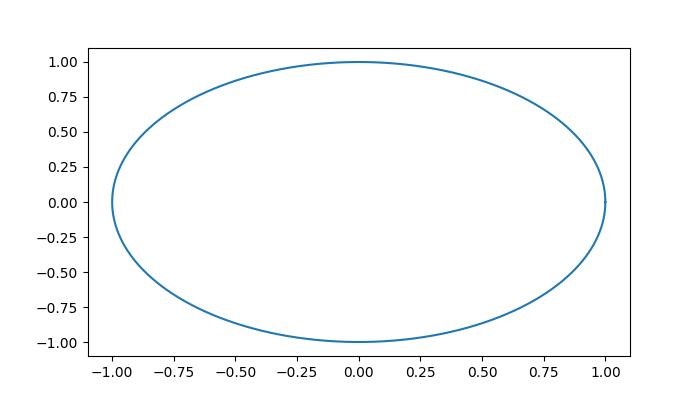
From the above figure, you can continuously read the coordinates of the mouse when it is moved −
data coords 0.22000000000192466, 0.8999999999988899, pixel coords 413, 324
data coords 0.21188940092360364, 0.9071428571417381, pixel coords 411, 325
data coords 0.20377880184528263, 0.9142857142845864, pixel coords 409, 326
data coords 0.19972350230612212, 0.9214285714274346, pixel coords 408, 327
data coords 0.1916129032278011, 0.9214285714274346, pixel coords 406, 327
data coords 0.1916129032278011, 0.9285714285702829, pixel coords 406, 328
data coords 0.18755760368864083, 0.9285714285702829, pixel coords 405, 328
data coords 0.18350230414948032, 0.9357142857131315, pixel coords 404, 329
data coords 0.17944700461031982, 0.9357142857131315, pixel coords 403, 329
data coords 0.1753917050711593, 0.9357142857131315, pixel coords 402, 329
data coords 0.1753917050711593, 0.9428571428559798, pixel coords 402, 330
data coords 0.1713364055319988, 0.9428571428559798, pixel coords 401, 330
data coords 0.1672811059928383, 0.949999999998828, pixel coords 400, 331
data coords 0.1632258064536778, 0.949999999998828, pixel coords 399, 331
Watch the video below to observe how the mouse move event feature works here.

Real-Time Plotting of Mouse Movement
It is possible to achieve near real-time plotting of mouse movement by using the motion_notify_event in matplotlib. This event allows you to capture the dynamic movement of the mouse cursor, enabling the creation of interactive and responsive visualizations.
Example
The following example demonstrates how to plot the mouse path in near real-time using Matplotlib.
import matplotlib.pyplot as plt

# Create the plot
fig, ax = plt.subplots(figsize=(7, 4))

# Set the limits of the plot
ax.set_xlim(0, 1920-1)
ax.set_ylim(0, 1080-1)

# Initialize lists to store mouse coordinates
x,y = [0], [0]

# create empty plot
points, = ax.plot([], [], '-', color='green')

# cache the background
background = fig.canvas.copy_from_bbox(ax.bbox)

def on_move(event):
   # Append the current mouse coordinates
   x.append(event.xdata)
   y.append(event.ydata)

   # Update the plot data
   points.set_data(x,y)

   # Restore the background
   fig.canvas.restore_region(background)

   # Redraw the points
   ax.draw_artist(points)

   # Fill in the axes rectangle
   fig.canvas.blit(ax.bbox)

# Connect the on_move function to the motion_notify_event
fig.canvas.mpl_connect("motion_notify_event", on_move)

# Display the plot
plt.show()
Output
On executing the above program you will get the following output −
Watch the video below to observe how the mouse move event feature works here.
Highlighting Triangles with TriFinder
Using the TriFinder class from the matplotlib.tri module to identify triangles within a Triangulation. By combining it with the motion_notify_event, you can dynamically highlight the triangle where the mouse moved over the triangulated plot.
Example
This example demonstrates the use of a TriFinder object in Matplotlib. As the mouse is moved over a triangulation, the triangle under the cursor is highlighted, and the index of the triangle is displayed in the plot title.
import matplotlib.pyplot as plt
import numpy as np
from matplotlib.patches import Polygon
from matplotlib.tri import Triangulation

def update_highlighted_triangle(triangle_index):
   if triangle_index == -1:
      points = [0, 0, 0]
   else:
      points = triangulation.triangles[triangle_index]
   xs = triangulation.x[points]
   ys = triangulation.y[points]
   highlighted_polygon.set_xy(np.column_stack([xs, ys]))

def on_mouse_move(event):
   if event.inaxes is None:
      triangle_index = -1
   else:
      triangle_index = tri_finder(event.xdata, event.ydata)
   update_highlighted_triangle(triangle_index)
   ax.set_title(f'In triangle {triangle_index}')
   event.canvas.draw()

# Create a Triangulation.
num_angles = 16
num_radii = 5
min_radius = 0.25
radii = np.linspace(min_radius, 0.95, num_radii)
angles = np.linspace(0, 2 * np.pi, num_angles, endpoint=False)
angles = np.repeat(angles[..., np.newaxis], num_radii, axis=1)
angles[:, 1::2] += np.pi / num_angles
x_values = (radii*np.cos(angles)).flatten()
y_values = (radii*np.sin(angles)).flatten()
triangulation = Triangulation(x_values, y_values)
triangulation.set_mask(np.hypot(x_values[triangulation.triangles].mean(axis=1),
   y_values[triangulation.triangles].mean(axis=1))
   < min_radius)

# Use the triangulation's default TriFinder object.
tri_finder = triangulation.get_trifinder()

# Setup plot and callbacks.
fig, ax = plt.subplots(subplot_kw={'aspect': 'equal'}, figsize=(7, 4))
ax.triplot(triangulation, 'bo-')
highlighted_polygon = Polygon([[0, 0], [0, 0]], facecolor='y')  # dummy data for (xs, ys)
update_highlighted_triangle(-1)
ax.add_patch(highlighted_polygon)
fig.canvas.mpl_connect('motion_notify_event', on_mouse_move)
plt.show()
Output
On executing the above program you will get the following output −
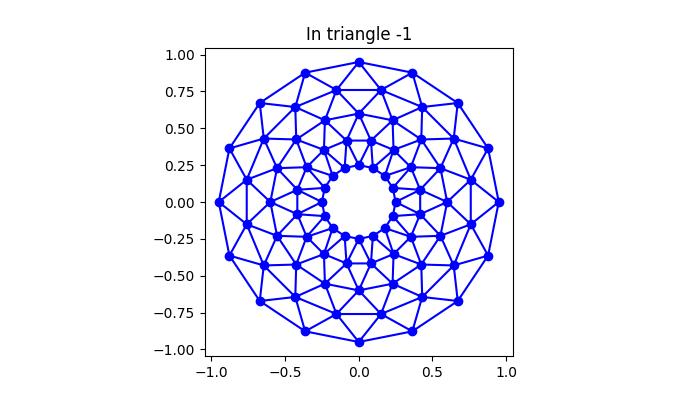
Watch the video below to observe how the mouse move event feature works here.
