- ASP.NET Tutorial
- ASP.NET - Home
- ASP.NET - Introduction
- ASP.NET - Environment
- ASP.NET - Life Cycle
- ASP.NET - First Example
- ASP.NET - Event Handling
- ASP.NET - Server Side
- ASP.NET - Server Controls
- ASP.NET - HTML Server
- ASP.NET - Client Side
- ASP.NET - Basic Controls
- ASP.NET - Directives
- ASP.NET - Managing State
- ASP.NET - Validators
- ASP.NET - Database Access
- ASP.NET - ADO.net
- ASP.NET - File Uploading
- ASP.NET - Ad Rotator
- ASP.NET - Calendars
- ASP.NET - Multi Views
- ASP.NET - Panel Controls
- ASP.NET - AJAX Control
- ASP.NET - Data Sources
- ASP.NET - Data Binding
- ASP.NET - Custom Controls
- ASP.NET - Personalization
- ASP.NET - Error Handling
- ASP.NET - Debugging
- ASP.NET - LINQ
- ASP.NET - Security
- ASP.NET - Data Caching
- ASP.NET - Web Services
- ASP.NET - Multi Threading
- ASP.NET - Configuration
- ASP.NET - Deployment
- ASP.NET Resources
- ASP.NET - Quick Guide
- ASP.NET - Useful Resources
- ASP.NET - Discussion
ASP.NET - First Example
An ASP.NET page is made up of a number of server controls along with HTML controls, text, and images. Sensitive data from the page and the states of different controls on the page are stored in hidden fields that form the context of that page request.
ASP.NET runtime controls the association between a page instance and its state. An ASP.NET page is an object of the Page or inherited from it.
All the controls on the pages are also objects of the related control class inherited from a parent Control class. When a page is run, an instance of the object page is created along with all its content controls.
An ASP.NET page is also a server side file saved with the .aspx extension. It is modular in nature and can be divided into the following core sections:
- Page Directives
- Code Section
- Page Layout
Page Directives
The page directives set up the environment for the page to run. The @Page directive defines page-specific attributes used by ASP.NET page parser and compiler. Page directives specify how the page should be processed, and which assumptions need to be taken about the page.
It allows importing namespaces, loading assemblies, and registering new controls with custom tag names and namespace prefixes.
Code Section
The code section provides the handlers for the page and control events along with other functions required. We mentioned that, ASP.NET follows an object model. Now, these objects raise events when some events take place on the user interface, like a user clicks a button or moves the cursor. The kind of response these events need to reciprocate is coded in the event handler functions. The event handlers are nothing but functions bound to the controls.
The code section or the code behind file provides all these event handler routines, and other functions used by the developer. The page code could be precompiled and deployed in the form of a binary assembly.
Page Layout
The page layout provides the interface of the page. It contains the server controls, text, inline JavaScript, and HTML tags.
The following code snippet provides a sample ASP.NET page explaining Page directives, code section and page layout written in C#:
<!-- directives -->
<% @Page Language="C#" %>

<!-- code section -->
<script runat="server">

   private void convertoupper(object sender, EventArgs e)
   {
      string str = mytext.Value;
      changed_text.InnerHtml = str.ToUpper();
   }
</script>

<!-- Layout -->
<html>
   <head>
      <title> Change to Upper Case </title>
   </head>

   <body>
      <h3> Conversion to Upper Case </h3>

      <form runat="server">
         <input runat="server" id="mytext" type="text" />
         <input runat="server" id="button1" type="submit" value="Enter..." OnServerClick="convertoupper"/>

         <hr />
         <h3> Results: </h3>
         <span runat="server" id="changed_text" />
      </form>

   </body>

</html>
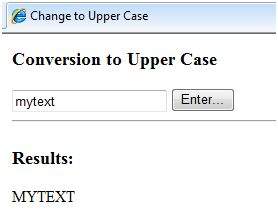
Copy this file to the web server root directory. Generally it is c:\iNETput\wwwroot. Open the file from the browser to execute it and it generates following result:


Using Visual Studio IDE
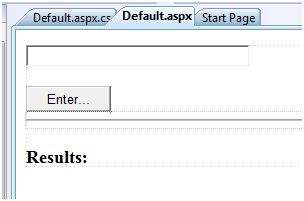
Let us develop the same example using Visual Studio IDE. Instead of typing the code, you can just drag the controls into the design view:

The content file is automatically developed. All you need to add is the Button1_Click routine, which is as follows:
protected void Button1_Click(object sender, EventArgs e)
{
   string buf = TextBox1.Text;
   changed_text.InnerHtml = buf.ToUpper();
}
The content file code is as given:
<%@ Page Language="C#" AutoEventWireup="true" CodeBehind="Default.aspx.cs"
   Inherits="firstexample._Default" %>

<!DOCTYPE html PUBLIC "-//W3C//DTD XHTML 1.0 Transitional//EN" "http://www.w3.org/TR/xhtml1/DTD/xhtml1-transitional.dtd">

<html xmlns="http://www.w3.org/1999/xhtml" >

   <head runat="server">
      <title>
         Untitled Page
      </title>
   </head>

   <body>

      <form id="form1" runat="server">
         <div>

            <asp:TextBox ID="TextBox1" runat="server" style="width:224px">
            </asp:TextBox>

            <br />
            <br />

            <asp:Button ID="Button1" runat="server" Text="Enter..." style="width:85px" onclick="Button1_Click" />
            <hr />

            <h3> Results: </h3>
            <span runat="server" id="changed_text" />

         </div>
      </form>

   </body>

</html>
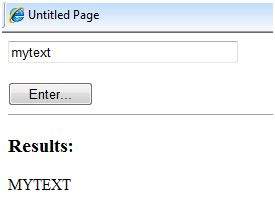
Execute the example by right clicking on the design view and choosing 'View in Browser' from the popup menu. This generates the following result:
